Build a Blog with Github - Part 1
How it all started
I’ve owned my personal domain name for a while now, but never got around to putting anything up. As someone previously in the corporate finance world, I didn’t have any particular information or portfolio pieces I needed to put up on a personal site that LinkedIn couldn’t handle.
Once I started to feel the need for a blog, $50-$100/year in hosting fees just felt like too much for a blog that I planned on updating occasionally and only when I had something substantial to document online.
Then I joined GitHub, and realized they allow you to host a personal blog/site, and map it to a custom domain.
Problem solved!
Or so I thought.
It’s when I started to really wade deep into setting up a Github personal site and blog that I realized it can be fairly intimidating to a non-programmer. I know just enough HTML and CSS to be dangerous and break things, which makes me the kind of adventurer that will start full throttle with a project like this, and get pretty far down a path before realizing I need to start over (several times).
At this point, I’ve got this at a stable enough state that I can call it a minor success. Some of you may want the journey with the dead ends because you can learn a lot from those - I know I learned quite a bit from all the paths that didn’t work out.
That said, there are probably a lot more of you who would like a minimalist portfolio site with a blog, hosted for free, mapped to your personal domain, as quickly as possible.
So, without further ado, here’s the process that’s got me this far.
Index
- .. A Starting Point
- 1. Buying A Domain
- 2. Setting up GitHub
- Option 1. Fork an existing repo
- Option 2. Start with an empty repo
- Bonus - Configure a Remote Link
- 3. Redirecting DNS Nameservers
- 4. Creating a CNAME file
Everyone needs a starting point
… and for that, I thank Joshua Lande for his excellent post http://joshualande.com/jekyll-github-pages-poole/ that gave me a general map to get started with.
1. Buying a domain
I had bought my domain artiannaswamy.com several years ago on GoDaddy, and every time I renewed it, I re-upped for the longest possible time, so that part was set.
There are a lot of articles recommending good domain name registrars and telling you what to watch out for - everything ranging from customer service, transfer fees, selling your info to shady marketers and so on. I’d read these and do your research, especially if you find a new registrar with a great price on the domain you want, but no reviews to go on.
GoDaddy is the better known brand name, but another company I’ve seen recommended quite often is NameCheap.
a. Private Registration
With most of the registrars out there, you pay one price per year for registering the domain, and another extra charge per year to protect your privacy, so they don’t put your name and address up publicly as the owner of the domain.
I always tack on the extra private registration charge, and GoDaddy and most other bigger companies often have good coupons and deals if you’re ready to commit to your domain for a long time.
b. Google and Amazon are in this business too
Google Domains is a new entrant in the field, and it looks like they have a flat annual registration price starting at $12+ and free private registration. For a basic, non-premium domain, that’s a fair price, if a tad expensive in comparison to what you could pay at a bigger registrar after coupons/promotions - but you know for sure you’re getting a known entity with Google. Here’s a good review on Google Domains that covers a few other aspects I wasn’t aware of - http://www.geekwire.com/2015/google-domains-useful-small-business-owners-useless-many-cases/
Same goes with Amazon 53’s domain name registration - their pricing schedule lists a flat $12/year with free private registration for .com domains. See here for the announcement http://aws.amazon.com/about-aws/whats-new/2014/07/31/amazon-route-53-announces-domain-name-registration-geo-routing-and-lower-pricing/
c. Bottomline on buying domains
Basically, make sure the following is squared away:
- Your privacy is protected to the level you want
- The registrar you use has a decent admin screen where you can redirect to other hosts
- The registrar is fairly sure to stick around for a while and won’t go bankrupt on you
- Put a strong password and the strongest protection the registrar offers. Domain stealing is a thing.
- Turn off auto renewal if you want to shop around, but put a reminder for yourself
2. Setting up your Github repository
This was one of those paths I mentioned earlier that led to a dead-end and a do over. You may end up having to do things over even after I’ve given you a heads-up, but hey, that’s the fun of this.
Let me back up a little.
So, you need to do the following to get set up on GitHub:
- Create a free GitHub account.
- Pick a username you can tell your grandmother without making her blush. Also pick a short one - this doesn’t need to look like your resume name either. Mine is aannasw, for example.
- Download and install a copy of GitHub desktop, especially if you don’t want to be using git code.
Now here’s a couple of reasons why I had to start over.
Lessons Learned - Forking a Repo
If you are starting with an existing github theme, especially one that’s being actively worked on, the developer of the theme may want you to ‘fork’ the theme from their repository. It creates a link from your repository to theirs, and you can also update your copy of it when they make changes to their theme.
Lessons Learned - Modifying a Theme’s Structure
I also figured I could pretty easily modify an existing blog theme that had the blog on the front page, to something that had a landing page + a link to the blog page. I ended up chasing my tail for several weeks before I decided to look for a theme already set up the way I wanted, and start over with that.
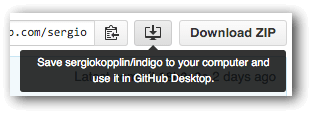
The theme I ultimately went with is the Indigo theme by Sérgio Kopplin.
Option 1 - Fork an existing repository

- Browse through the themes listed on jekyllthemes.org, play with the demos, check out all the features, and if they have the files hosted on Github, follow the link to their repository
- Log in to your GitHub account
- Click ‘Fork’ on the repository you want to copy to your profile
- Name it whatever the theme’s name is, for now. You’ll be renaming this anyway.
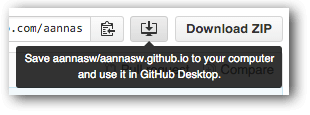
- Go to the repository settings and rename it like so: yourusername.github.io. This is important. Mine, for example, is aannasw.github.io.
- Click the ‘Save to your Desktop’ icon to download all the files to your desktop.
- Type in the url http://yourusername.github.io and you should now see the theme you just forked.
- You’re done for now, but if you have the patience for some git code, check out the ‘Bonus Section for Option 1’ below, after Option 2.
Option 2 - Start with an empty repository and copy a .zip theme file or DIY it
- Go to your GitHub account and create a new repository and name it like so: yourusername.github.io. This is important. Mine, for example, is aannasw.github.io.
- Click the ‘Save to your Desktop’ icon. This will create an empty folder inside your GitHub repositories folder.
- Go to jekyllthemes.org, find a theme you like, and download the zip file to your desktop

- Extract the contents and copy everything over to your empty username.github.io repository
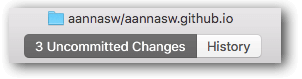
- Launch your GitHub Desktop, and you will see that the new repository you created now shows several files in a list, with the tab titled ‘# Uncommitted Changes’.
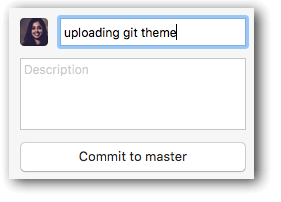
- Type up a description for the update you’re about to send to your github and click ‘Commit to Master’
- Hit ‘Ctrl + S’ on your keyboard, or click the ‘Sync’ button on the top right of your GitHub desktop, and after all the changes have gone through, wait for about 5 seconds for GitHub to build your site and display it.
- Type in the url http://yourusername.github.io and you should now see the theme you just uploaded to your repository.
Bonus section for Option 1
If you have the patience for some git code, this will help set up a back end connection between your repository and your source theme repository, so that any changes made by the theme developer will show up in your GitHub Desktop as a clickable button that says ‘Update from sourceuser/sourcerepo’.
Note - You may not always want to make every change, especially if it overrides customizations you’ve made, but it helps when the theme developer adds new features or fixes bugs.
GitHub Help articles to get started with:
- https://help.github.com/articles/configuring-a-remote-for-a-fork/
- https://help.github.com/articles/syncing-a-fork/
Configuring a remote link
- Open up your Terminal. Git comes pre-installed in your Terminal, so no need to install anything further
- Change the directory to get to your website repository
$ cd Github
$ cd aannasw.github.io- Type in
git remote -vto see what the current remote status is. It should look like this:
$ git remote -v
origin	https://github.com/aannasw/aannasw.github.io.git (fetch)
origin https://github.com/aannasw/aannasw.github.io.git (push)- Log in to GitHub in your browser, and go to the source page of your theme
- Click on the ‘Copy to Clipboard’ icon to copy the url of the source repo
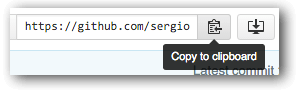
- Return to Terminal and type in
git remote add upstream <the-url-you-just-copied>.Then re-typegit remote -vto confirm the remote upstream link.
$ git remote add upstream https://github.com/sergiokopplin/indigo.git
$ git remote -v
origin	https://github.com/aannasw/aannasw.github.io.git (fetch)
origin	https://github.com/aannasw/aannasw.github.io.git (push)
sergiokopplin	https://github.com/sergiokopplin/indigo.git (fetch)
sergiokopplin	https://github.com/sergiokopplin/indigo.git (push)
upstream	https://github.com/sergiokopplin/indigo.git (fetch)
upstream https://github.com/sergiokopplin/indigo.git (push)- You can check for the latest updates by entering
git fetch upstreamandgit merge upstream/gh-pages, or by clicking on the ‘Update from sourceuser/sourcerepo’ button in your GitHub Desktop
$ git fetch upstream
From https://github.com/sergiokopplin/indigo
 * [new branch]      gh-pages   -> upstream/gh-pages
$ git merge upstream/gh-pages
Already up-to-date.- With either of the routes above, you may end up with changes you don’t want to merge, as those may override custom code you’ve added, but decide that on a file-by-file basis.
3. Redirecting your domain (DNS Nameservers) to point to GitHub
I dusted off my logins to GoDaddy, and after following David Ensinger’s post recommended in the article above, Setting the DNS for GitHub Pages on Namecheap and Andrew Sturges’ post on Configuring a Godaddy domain name with github pages, I had successfully redirected my domain to point to GitHub.
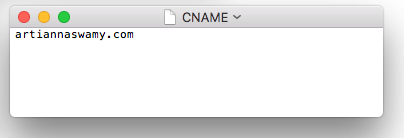
4. Creating a CNAME file
So, if you finished the step above to redirect your domain, you must have created or updated the ‘CNAME’ of your domain. GitHub doesn’t know what your domain is, so you now have to create a file in your new repository to connect it up from this end.
This would be a good time to download TextWrangler (Mac) or Notepad++ (Windows) or your advanced text editor of choice, if you don’t already have it installed. It’s a more advanced version of TextEdit / Notepad, and you will need this going forward if you want to maintain your blog.
- Go to your repository folder and find the file called ‘CNAME’. If you’ve downloaded a theme maintained specifically for download and reuse, they’ll have a file named CNAME in there.
- Double-click on it, and hope it opens up in your text editor. If it doesn’t, open up the text editor and then browse to and open this file.
- Type in your domain name like so: domainname.com without any www or http in the front. My CNAME file just has that one snippet of text: artiannaswamy.com.
- Save the file
- Go to GitHub Desktop, and you should see one uncommitted change for the edit you made to the CNAME file. Type a short update summary and commit this change.
- Wait for a few seconds, and then type in your personal domain name in a different browser than the one you normally use, and if it has a private mode, use that. The browser you regularly use might have cached history that could confuse things, and you want to see how the world will see your domain.
- What hopefully happens at this stage is, the theme you uploaded to your new repository on GitHub now shows up when you go to your domain name.
- If it doesn’t, go through all the steps above again, read all the linked articles and google until you find the answer. Like I said, this is the fun part.
You now have a live website.
Stay tuned for how you can modify content, add new pages, set custom post URLs, create a hidden draft feature, add tags, and create a dynamic tag index in the part 2 of this post.
Here’s Part 2 of this post https://www.artiannaswamy.com/build-a-github-blog-part-2

Arti Annaswamy
Data analytics, process improvement, project management, coffee drinking