Build a Blog with GitHub - Part 2
Here’s Part 1 of this post https://www.artiannaswamy.com/build-a-github-blog-part-1
We left off at the point where your site is live, but the theme inhabiting it doesn’t have your information.
Let’s fix that first, then try a few customizations.
Index
- 1. Personalize your site
- 2. Add New Pages
- 3. Set Custom URLs for Posts
- 4. Setup Hidden Drafts
- 5. Different headers for different pages
- 6. Tags and Tag Indexes
1. Personalize your site
With a GitHub theme, the first place you start is with the _config.yml file.
The developer will have provided some documentation to go with the theme - read that first to see if there are any special quirks to the config file. Then open up the config file, and browse through the various variables.
This is the control center of your site. Updates you make here will get reflected in multiple areas of the site, not necessarily just the home page.
Let’s go through some of the config settings in the Indigo theme I am using on my site. Here is the original _config.yml file from the source theme. Let’s take these one at a time.
name: John Doe
bio: 'A Man who travels the world eating noodles'

# main text of home
picture: 'assets/images/profile.jpg'

url: https://sergiokopplin.github.io/indigo
# your url: https://USERNAME.github.io

permalink: /:title/

markdown: kramdown
highlighter: rouge

analytics-google: 'UA-MYANALYTICS'

# if you don't want comments in your posts, set to false
disqus: mydisqus

# if you don't have any of social below, comment the line
facebook: myfacebook
twitter: mytwitter
# google: mygoogle
# instagram: myinstagram
# pinterest: mypinterest
linkedin: mylinkedin
youtube: myyoutube
spotify: myspotify
github: mygithub
email: myemail@gmail.com

# if you don't need pagination, comment the *paginate* configs below
# paginate: 5
# paginate_path: "blog/:num/"

# if you don't need projects, comment the *projects* configs below
projects: true

# if you don't need "about" or "blog", comment them out below
about: true
blog: true

# do you want to show the "read time" of the posts?
read-time: true

# do you want to show the "tags" inside the posts?
show-tags: true

# related posts inside a post?
related: true

# do you want some animations?
animation: true

gems:
  - jemoji
  - jekyll-mentions
  - jekyll-seo-tag
  - jekyll-feed
  - jekyll-sitemap
  - jekyll-gist
  - jekyll-paginate

jekyll-mentions:
    base_url: https://github.com

exclude: [README.md, Gemfile, Gemfile.lock, node_modules, gulpfile.js, package.json, _site, src, vendor, CNAME, indigo-gh-pages.zip, Rakefile, screen-shot.png, travis.sh]
Name & Bio
name: John Doe
bio: 'A Man who travels the world eating noodles'
The first thing you want to replace is, of course, the name and bio with your own name and a short description of who you are / what you do. Follow the syntax of the original file when changing the information. That is, for example, replace John Doe with your name, but don’t put it in quotes, just like in the original file. However, in the Bio, the author has used single quotes on either side of the phrase, so you should do the same.
Profile Picture
picture: 'assets/images/profile.jpg'- On your computer, browse to the assets > images folder in your GitHub directory for this site, and find the profile.jpg file.
- Note the dimensions of the file, and
- Create a file with your own picture (or whatever pleases you) with the same dimensions.
- Replace the profile.jpg file with your file.
URLs
url: https://sergiokopplin.github.io/indigo
# your url: https://USERNAME.github.io
If you were sticking with the yourusername.github.io naming for your website, you’d change this URL to the github.io address. But since you have your personal domain mapped to this, you want to change this field to https://yourdomain.com.
Google Analytics
You can leave the permalink, markdown and highlighter fields alone for now.
analytics-google: 'UA-MYANALYTICS'Google Analytics is definitely something you want to set up now so you can keep an eye on the stats for your site.
- Go to https://www.google.com/analytics/ and sign in with your Gmail ID (or create one, if you don’t have one).
- Go to the ‘Admin’ tab
- There should be three columns, with a dropdown at the top of each. In the first column, click the dropdown, and click ‘Create New Account’
- Fill out the fields like so:
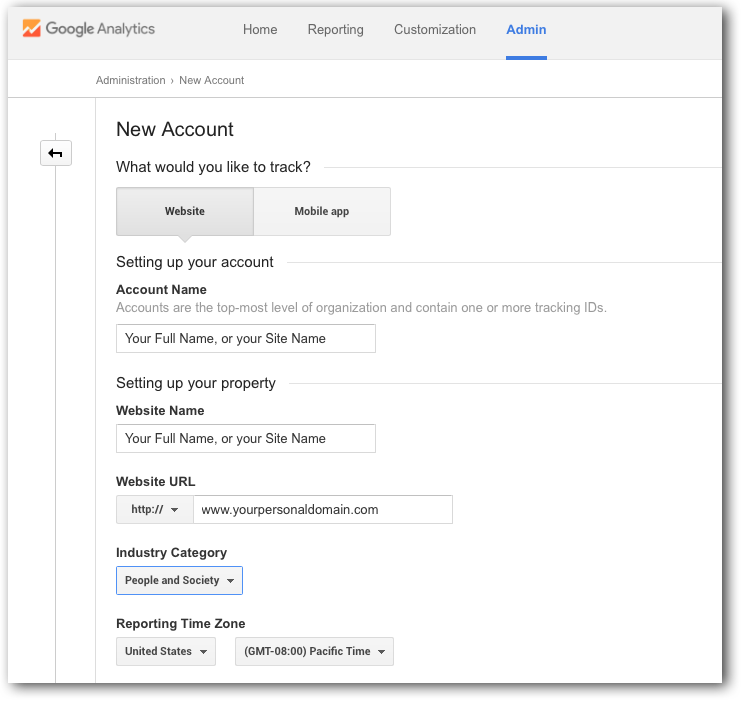
- Read through the data tracking section and check or uncheck each of the settings as you prefer.
- Click ‘Get Tracking ID’
- Google will create tracking ID for you that’ll look something like ‘UA-########’.
- Copy this tracking ID, return to your _config.yml and paste it in the analytics-google field.
Note: Make sure you set up filters in the Google Analytics Admin panel to exclude your own IP address. This excellent tutorial will help you through the steps: How to exclude internal traffic from Google Analytics.
Disqus
disqus: mydisqusTo set up Disqus commenting on your blog:
- Go to the Disqus website and set up an account (need not match any name or URL you’ve used to set up this site).
- Once you have an account, go to Settings and click ‘Add Disqus to Site’
- Click ‘Start using Engage’
- Fill out the form, and make sure you note the shortname you use in setting up this account
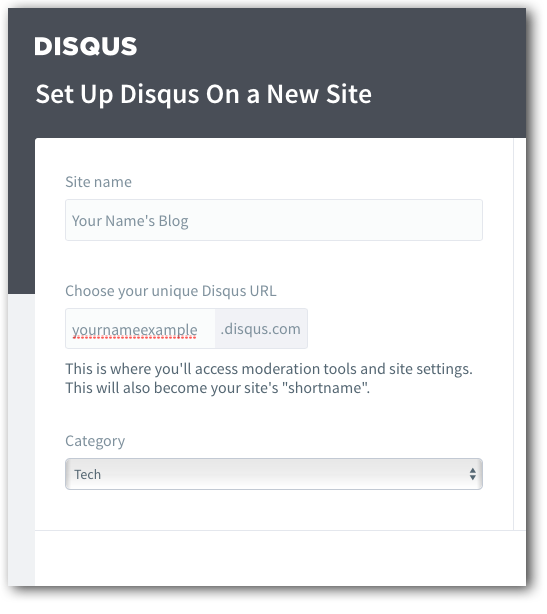
- Return to your config file and paste this shortname in the disqus field.
Social Links
facebook: myfacebook
twitter: mytwitter
# google: mygoogle
# instagram: myinstagram
# pinterest: mypinterest
linkedin: mylinkedin
youtube: myyoutube
spotify: myspotify
github: mygithub
email: myemail@gmail.com- Replace the dummy names (myfacebook, mytwitter etc) with your actual IDs from each of the sites, and you’re good to go.
- If you don’t want a specific social link to show below your picture on the front page, put a ‘#’ symbol in the front, which will comment out the line and not run it as code.
Blog features setup
# if you don't need pagination, comment the *paginate* configs below
# paginate: 5
# paginate_path: "blog/:num/"

# if you don't need projects, comment the *projects* configs below
projects: true

# if you don't need "about" or "blog", comment them out below
about: true
blog: true

# do you want to show the "read time" of the posts?
read-time: true

# do you want to show the "tags" inside the posts?
show-tags: true

# related posts inside a post?
related: true

# do you want some animations?
animation: true
The sections here are all self-explanatory. If you want to see exactly what they affect, turn off and on each of the features, and see what happens.
To summarize the settings:
- projects, about and blog settings set to
falsewill remove the links from the front page and the navigation - read time, tags and related posts settings affect extra info inside the posts itself
- animations will affect that initial dropping effect visible in the title and the social links whenever you launch/refresh the home page
2. Add New Pages
I liked the way this theme was organized, because I found it pretty intuitive to follow along on the various references to other files till I found the one I wanted to change. For example, if you start at index.html (Right Click > Open With … TextWrangler), you’ll see references to header.html and footer.html. If you open up header.html in the _includes folder, you will see the code that controls which pages the header applies to.
Here’s that code in the original theme:
From that first line, it looks like the header defined in lines 3 - 14 will show only if the page title is Home or Blog or About.
Which means, if you add any new pages, it won’t include the Header, unless you add a reference to that new page here. So, let’s do that.
- Edit the first part of the snippet to:
if page.title == "Home" or page.title == "Blog" or page.title == "Projects" or page.title == "Consulting"- Then, switch over to your GitHub directory, and find the About page and make a copy of it.
- Rename this copy to Consulting, and keep the file extension the same as the About page
- Open the newly renamed Consulting.md
- The part at the very top between the two triple-dashed lines is called the YAML front matter and will be processed first, and that’s the key.
- Here’s the YAML from the About page:
---
title: About
layout: page
permalink: /about/index.html
---- Change that to:
---
title: Consulting
layout: page
permalink: /consulting/index.html
---- Next, head over to the nav.html file, and you’ll see sections of code for each of the pages. Copy and paste the ‘About’ section, and change all the abouts to consultings.
- That should do it for adding a new page. After you commit all the changes and sync, you should see a link to the new Consulting page on your site.
3. Set Custom URLs for Posts
For this one, I refer you to another excellent post by Joshua Lande https://joshualande.com/short-urls-jekyll/. I followed this exactly, and it’s worked great for me.
4. Setup Hidden Drafts
This feature’s something I’m still testing, and I may end up making edits to this section down the road. At this point, I set this up as described in this thread https://gist.github.com/carlo/2870636.
A few pros and cons on how this works out practically:
Pros:
- If you’re using GitHub Desktop for your updates, you don’t have the benefit of installing jekyll, ruby et all and building the site on your desktop and testing it locally (without publishing to the web). Implementing this introduces the missing draft feature.
- It publishes the post, but hides it from the Blog page list, so you can review the content and layout before officially publishing it
Cons:
- It does actually publish it online. Where that shows up, is in the RSS feed. I’m still looking for a way to exclude draft posts from the rss feed.
Jekyll Feed documentation seems to suggest this is already a feature, but only if it’s implemented as a _drafts folder, which you will need to run some git code on to build and serve on your desktop.
Here’s how you include a drafts feature with the Indigo theme we are using.
- At this point, hopefully you haven’t published too many blog posts.
- Open up all the posts (not projects - you can tell by checking for projects: true or blog:true in the YAML front matter) in the _posts folder in your text editor, and
- Add
drafts: trueordrafts: falseto the header, depending on whether or not you want that post to show in the blog page. - Switch to your GitHub directory, browse to the _includes folder, and open up the
blog-post.htmlfile in your text editor - Here’s the original file:
- You want to change this as follows:
- As you can tell, it adds a validation to the blog post page to check if the draft variable is set to false (i.e. it is not a draft, but a published post) before including it in the list.
- That’s it. When you commit and sync up the changes, you should now only see the non-draft posts in your blog home page.
5. Different headers for different pages
At some point, I realized, I didn’t want to see my face at the top of every single page - Blog, About, Project, Consulting, in addition to Home.
The place you can change this is a familiar one - the header.html file we modified in section 2 above. Add the two sections below (line 4, and lines 20 - 25) to the header.html file, and you should now have a more minimal header on all pages except the Home page.
6. Tags and Tag Indexes
This one’s a little involved, but still not too hard. Let’s look at the various phases of this:
- Add the ruby script in the plugins folder
- Update the tag links inside blog posts to be clickable links
- Create a tag index page, just like a blog post page. Also create dummy folders and index.html pages (this is a GitHub quirk) to get the individual tag pages to show
- Edit the blog post page to also show the tags
- Add a custom header and navigation to the top
The instructions on this came from this excellent post https://erjjones.github.io/blog/Part-two-how-I-built-my-blog by Eric Jones.
Step 1. Add the ruby script in the plugins folder
- Go to the blog post linked above, and copy just the code for the tag_gen.rb file.
- Paste this in a new file in your text editor
- Create a new _plugins directory at the root level of your website repository
- Save the file as tag_gen.rb in this new folder
For the next three steps, note that your tags can be displayed in three places:
- Inside the blog post, just near the header
- In its own tag home page that will show all the posts related to that tag
- On the blog post home page, where all your blog posts are listed
Step 2. Update tag links inside blog posts to be clickable links
- Open your _layouts/post.html file in a text editor
- Find the snippet of code below between lines 13 and 19
- Replace that line in the middle with the updated line below
This will change the non-hyperlinked tags displayed in your post to clickable links. Your final result may not look like this, but play with the appropriate CSS to get it looking that way.
Step 3. Create a tag index page and folder structure
Here’s the code for creating tag index pages:
-
Copy and paste the code below into a new text editor file, and save the file as tag_content.html in the _includes folder
- Next, create a tags folder at the root level of your directory
- Create individual folders for each of the tags you have in your blog posts. This is the one pain of this system - each time you create a new tag, you’ll have to remember to create a folder for it in your repository.
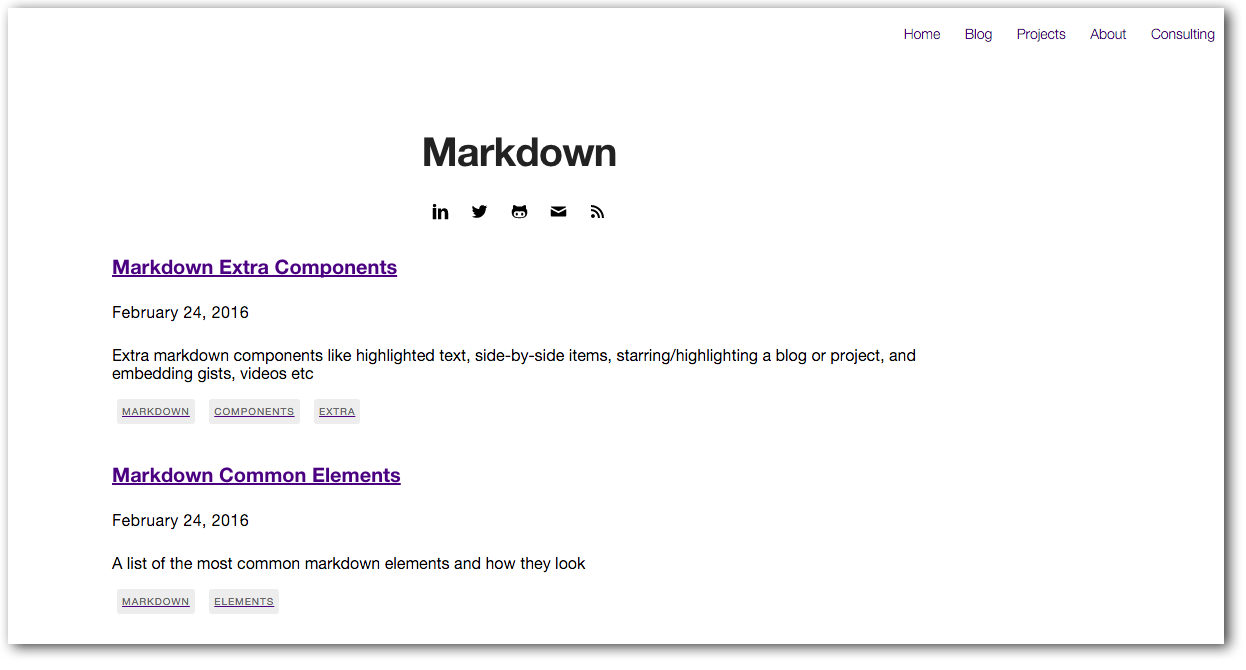
- For the following example, let’s assume you’ve created a folder named markdown, one of the tags you are using in your blog post.
-
Next, copy the code below into a new text editor file. Save that file as index.html in the tags/markdown/ folder.
- The path of the file above will be /tags/markdown/index.html
- Test to make sure this works. Commit all the changes, browse to the blog post that uses the markdown tag, and click on the markdown tag to see if the tag index page shows up.
- Copy that index.html file into each of the tag folders you’ve created, and make sure to change the title and the tag YAML fields every time.
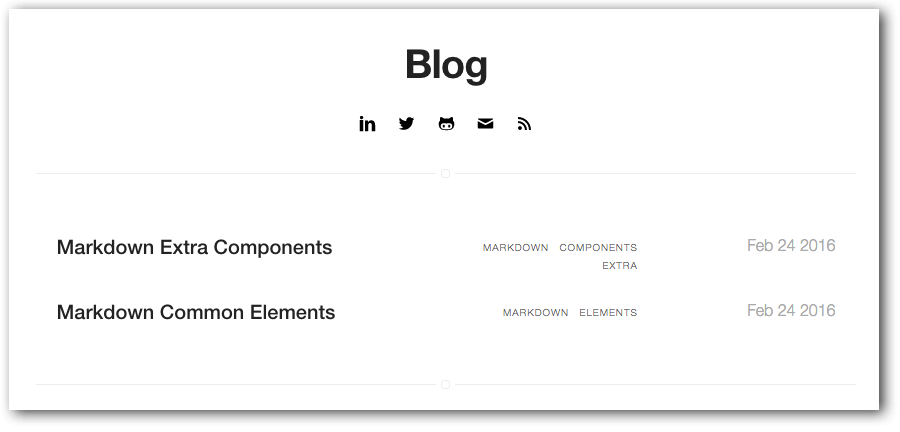
That’s it - you now have a working tag feature on your blog!
Step 4. Edit the blog post page to also show the tags (OPTIONAL)
This one is optional - only if you want the blog home page containing the list of all your blog posts to also show the tags associated with each post. Currently these tag links aren’t clickable from the home page - when you click on that row, it’ll lead to the blog post you just clicked.
You might find that look too busy, or not very useful since the tags aren’t clickable from the main page, so consider this feature optional.
Recall that your _includes/blog-post.html file currently looks like this:
We are going to add one more section of code between lines 5 and 6 to display the list of tags on the main page.
Here’s the updated file with the new code from line 6 to line 14:
The tags should now show up on your blog post home page. Your final result may not look like this, but play with the appropriate CSS to get it looking that way.
Step 5. Add a custom header and navigation to the top
The top of this tag index page probably looks a little bare right now.
If you recall, in section 5 of this post, we created custom minimal headers for the pages other than the Home page. We would want those minimal headers with the navigation to be visible at the top of the tag index pages too.
- So, let’s switch back to the header.html file. We left the file at this stage:
- Between lines 4 and 6, we are now going to add this snippet:
The minimal header should now show for your tag index pages as well.
And that’s it folks! I’ll continue updating this series as I add more features, but thanks for following along and comment on this post or message me if you have any questions / suggestions.

Arti Annaswamy
Data analytics, process improvement, project management, coffee drinking